
It really doesn’t get much more fun than a DIY Puppy Piñata. And frankly, now that I’ve had one, I couldn’t imagine a dog birthday party without it!
Combining the fun of a treat ball, with the glitter of a disco ball, our DIY Puppy Piñata kept Soda entertained throughout the day.
Follow these easy step by step instructions to make your own in no time…

YOU’LL NEED:
Paper Mache Numbers or Letters – to spell out your dog’s name or age* (I got mine from Lincraft)
Non-toxic craft glue
Crepe or tissue paper (I used metallic gold tissue)
Scissors
Acto Knife
String/Twine
Small dog treats
* Good luck to you if your dog’s name is Sir Winston the Hound of of Essington
INSTRUCTIONS:
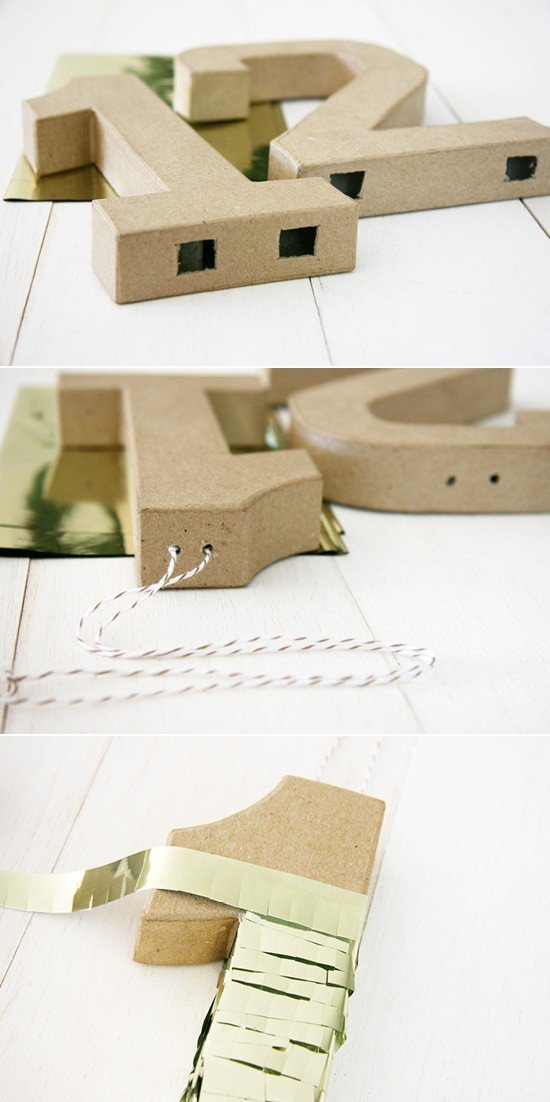
1. Using your acto knife take each paper mache number/letter and cut 1-2 small holes in the base. This is the entry/exit point for the dog treats.
2. Using your acto knife, punch two small holes in the top of each letter and thread through your twine for hanging.
3. Grab your tissue paper. Leave it folded as it comes in a fresh package, and cut off a 3cm wide strip. On the strip snip the fringing about 1cm apart and halfway up the strip. Unfold, and you should have one full strand of fringed tissue. Repeat this step until you have enough fringing to cover your numbers/letters.
4. Take your fringing and start gluing it piece by piece to your number/letter starting from the bottom and working your way up. Glue the un-fringed part down then overlap the tissue paper so that the only portion that shows is the fringe. Repeat this step until your number/letter is fully covered. Leave to dry.
5. Once dry, take your completed piñatas and fill with dog treats, shaking them throughout the inside.
6. Hang your piñata and let your dog use their snout and paws to shake the treats free. Enjoy!


HANDY HINTS:
* Due to the smaller nature of the puppy piñata, you may need to cut smaller pieces of fringing to cover corners.
* If you can’t thread string through the top, just use a stapler to attached the hanging string to your completed piñata.
* Always supervise your dog with the puppy piñata. It is designed for your dog to use their snout and paws to shake the treats free as they would with a treat ball. Do not allow your dog to bite the piñata.
* Unlike regular piñatas, the puppy piñata is designed to stay intact and not break apart. Have fun!